一、ElasticSearch学习笔记
撸一门技术,必先登其官网,扒其皮,喝其血
官网地址:https://www.elastic.co/products/elasticsearch
官方中文文档地址:https://www.elastic.co/guide/cn/elasticsearch/guide/current/index.html
1.1.ElasticSearch简介
ElasticSearch是一个分布式搜索服务,提供的是一组Restful API,底层基于Lucene,采用多shard(分片)的方式保证数据安全,并且提供自动resharding的功能。是目前全文搜索引擎的首选,可以快速的存储、搜索和分析海量数据,Springboot通过整合Spring Data ElasticSearch为我们提供了非常方便的检索功能支持。
1.2.ElasticSearch原始安装
系统环境
- CentOS 7.6.1810
- jdk 1.8.0_201
所需安装文件
- elasticsearch-6.6.0.tar.gz
- jdk-8u201-linux-x64.tar.gz
- elasticsearch-head-master.zip
- node-v10.15.1-linux-x64.tar.gz
elasticsearch安装方法
1 | tar -zxvf elasticsearch-6.6.0.tar.gz -C /opt/module/ # 解压安装包 |
1 | [root@localhost elasticsearch-6.6.0]# mkdir data # 创建数据文件夹(6.0自带logs文件夹) |
1 | vi elasticsearch.yml # 修改配置文件 |
1 | cluster.name: my-application # 集群名称(多集群时候只需节点名称一直即可) |
注意:node.name可以随便取,但是一个集群中不能重复,注意path.data前不能有空格,冒号后必须有一个空格
elasticsearch常见问题解决
问题一:ERROR: bootstrap checks failed
1 | su root |
1 | * soft nofile 65536 |
问题二:max number of threads [1024] for user [lish] likely too low, increase to at least [2048]
1 | vi /etc/security/limits.d/90-nproc.conf |
问题三:max virtual memory areas vm.max_map_count [65530] likely too low, increase to at least [262144]
1 | vi /etc/sysctl.conf |
elasticsearch启动
elasticsearch禁止使用root用户启动,需要新建一个testuser用户
1 | [testuser@hadoop102 elasticsearch-6.6.0]$ ./bin/elasticsearch |
ElasticSearch插件安装
插件地址:https://github.com/zt1115798334/elasticsearch-head-master
Nodejs安装
1 | tar -zxvf node-v10.15.1-linux-x64.tar.gz -C /opt/module/ |
1 | vi /etc/profile |
elasticsearch-head-master安装
1 | [root@hadoop102 sortware]# unzip elasticsearch-head-master.zip -d /opt/module/ |
1 | [root@hadoop102 elasticsearch-head-master]# npm install grunt --save |
1 | npm install -g cnpm --registry=https://registry.npm.taobao.org |
1 | npm install -g grunt-cli |
1 | vim Gruntfile.js |
1 | options: { |
1 | # 检查head根目录下是否存在base文件夹 没有:将 _site下的base文件夹及其内容复制到head根目录下 |
1 | [root@hadoop102 module]# chown -R luokangyuan:luokangyuan elasticsearch-head-master/ |
1 | [luokangyuan@hadoop102 elasticsearch-head-master]$ grunt server -d |
1 | npm install grunt-contrib-clean -registry=https://registry.npm.taobao.org |
1 | http://192.168.1.8:9100/ |
1 | vi elasticsearch.yml |
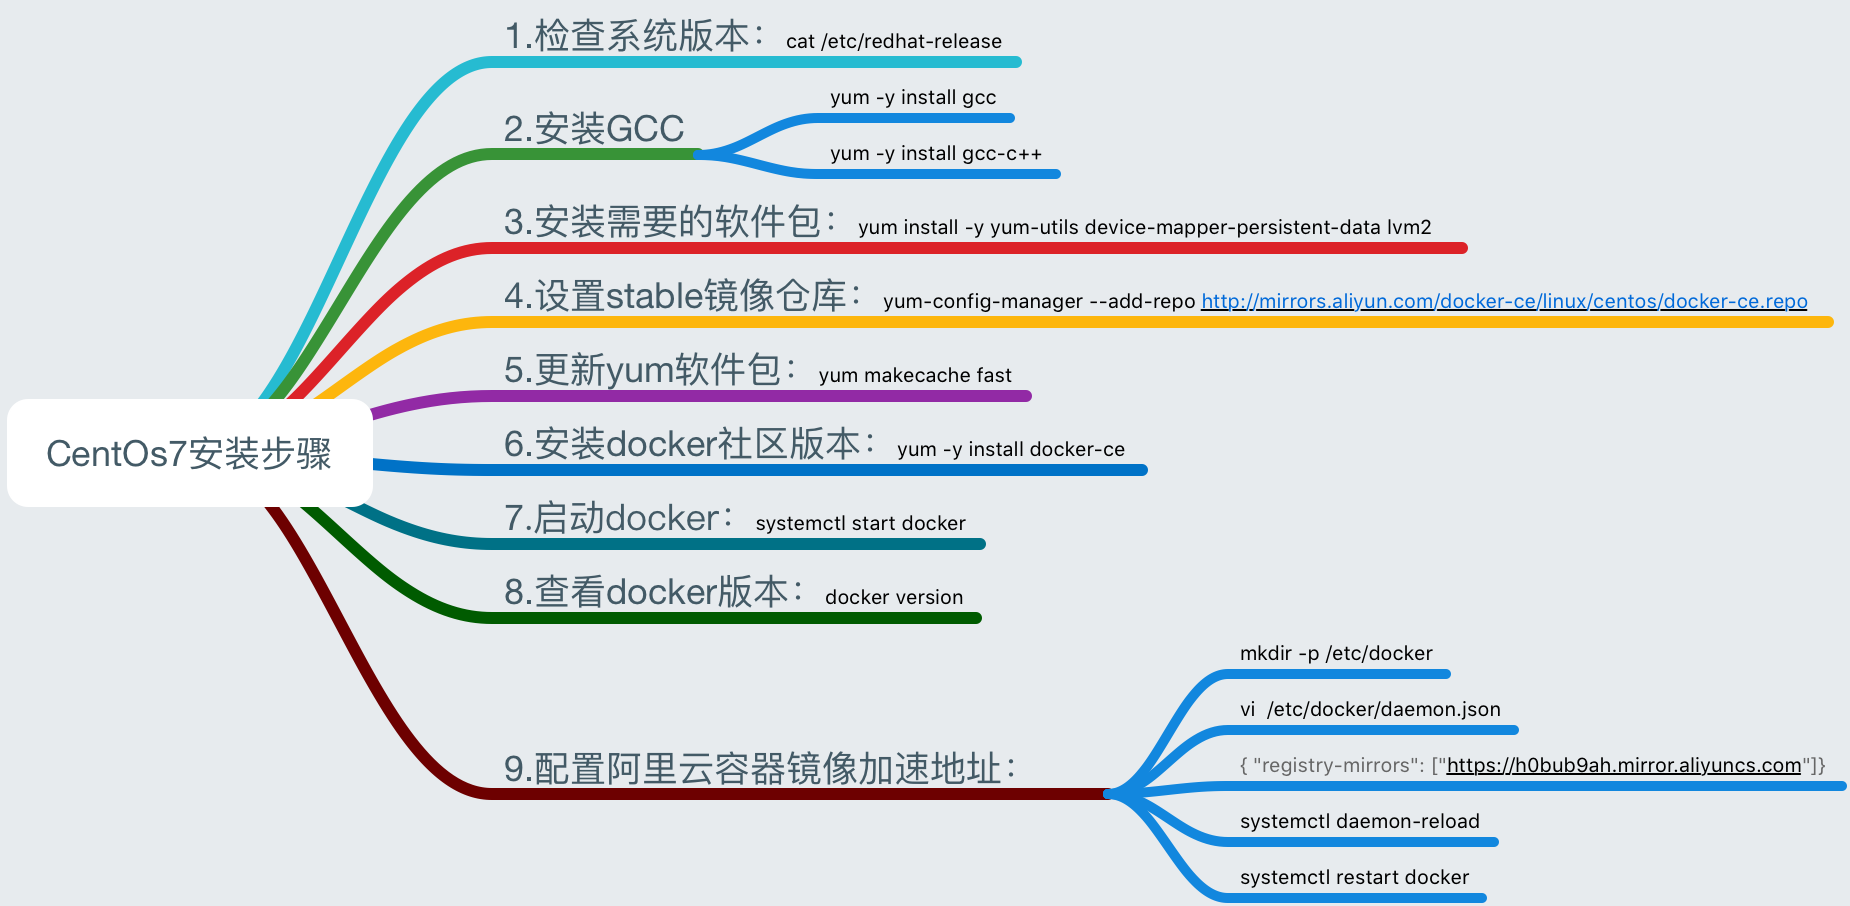
1.3.ElasticSearch的docker安装
启动Docker
1 | [root@localhost /]# systemctl start docker |
搜索镜像
1 | [root@localhost /]# docker search elasticsearch |
使用镜像加速器下载
1 | [root@localhost /]# docker pull registry.docker-cn.com/library/elasticsearch |
检查是否安装成功
1 | [root@localhost /]# docker images |
启动ElasticSearch
1 | docker run -e ES_JAVA_OPTS="-Xms256m -Xmx256m" -d -p 9200:9200 -p 9300:9300 --name ES01 5acf0e8da90b |
检查是否启动
1 | [root@localhost /]# docker ps |
访问测试
1 | http://192.168.1.14:9200/ |
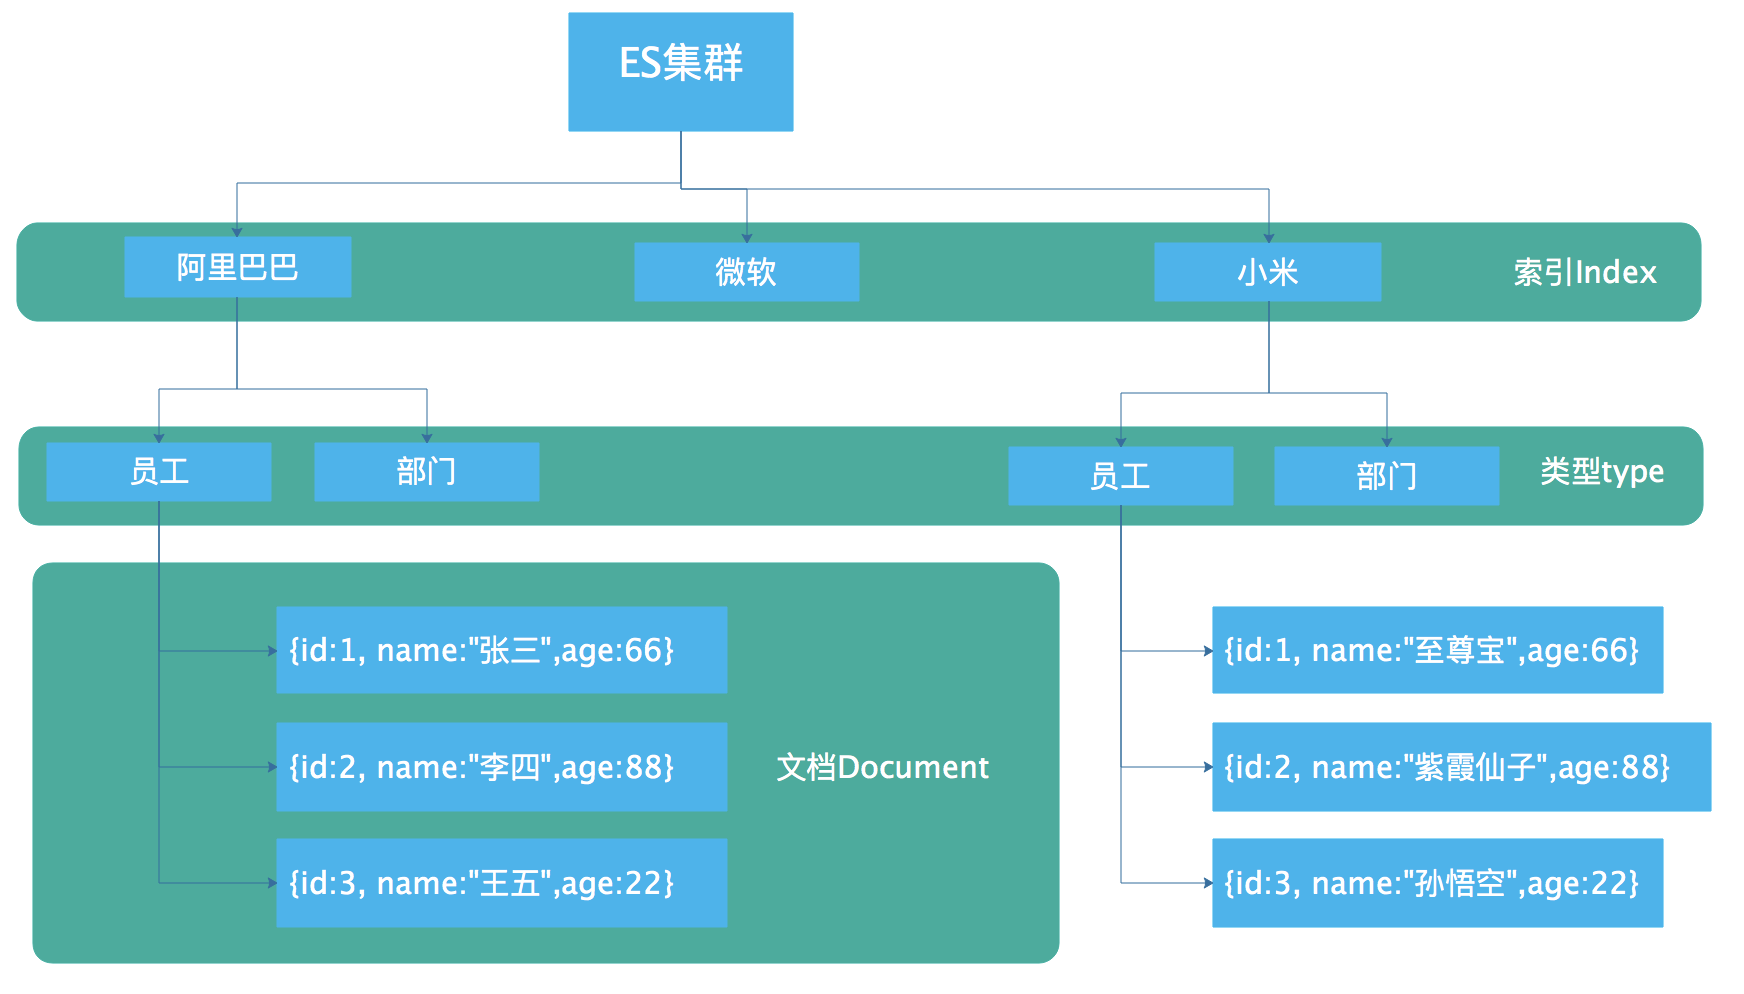
1.4.ElasticSearch核心概念
Cluster集群
集群就是包含了多个节点,每一个节点属于哪一个集群是通过一个集群名称配置。
Node节点
集群中的一个节点,节点也存在名称,默认是随机分配一个名称,默认节点会加入到一个elasticsearch集群中。
Index索引
索引包含的是一大推相似结构的文档数据,例如我们的商品索引,订单索引等,类比于我们的数据库。
Type类型
每一个索引里面可以有一个或者多个type,type是index中的一个逻辑数据分类,比如我的博客系统,一个索引,可以定义用户数据type,可以定义文章数据type,也可以定义评论数据type,类比数据库的表。
Document文档
文档是ElasticSearch中最小的数据单元,一条Document可以是一条文章数据,一条用户数据,一条评论数据,通常使用JSON数据结构来表示,每个index下的type中,存储多个document,类别数据库中的行。
Field字段
Field是ElasticSearch中的最小单位,一个document里面粗在多个Field字段,每个Field就是一个数据字段,类比数据库中的列。
mapping映射
数据如何存储在索引上,需要一个约束配置,例如数据类型,是否存储,查询的时候是否分词等等,类比数据库汇总的约束。
ElasticSearch和数据库对别
| 关系型数据库Mysql | 非关系型数据库ElasticSearch |
|---|---|
| 数据库Database | 索引Index |
| 表Table | 类型Type |
| 数据行Row | 文档Document |
| 数据列Column | 字段Field |
| 约束Schema | 映射Mapping |
ElasticSearch核心概念图解
1.5.Springboot集成ElasticSearch
Springboot默认使用Spring Data Elasticsearch模块进行操作,同时也存在另外一个操作ElasticSearch的模块,那就是jest。
使用Jest与ElasticSearch进行交互
Jest的GitHub地址:https://github.com/searchbox-io/Jest
Jest文档地址:https://github.com/searchbox-io/Jest/tree/master/jest
第一步:增加POM 文件
1 | <dependency> |
第二步:增加ElasticSearch配置项
1 | spring: |
第三步:使用JestClient进行交互
1 | public class Users { |
1 |
|
最后测试
1 | http://192.168.1.9:9200/wzry/yxjs/2 |
使用Spring Data Elasticsearch
官方文档地址:https://docs.spring.io/spring-data/elasticsearch/docs/3.1.5.RELEASE/reference/html/
第一步:增加POM文件
1 | <dependency> |
第二步:增加配置项
1 | spring: |
第三步:进行数据交互
1 | (indexName = "study", type = "book") |
1 | public interface BookRepository extends ElasticsearchRepository<Book, Integer> { |
1 |
|
注意:如果启动报错,可能是spring data elasticsearch和elasticsearch存在版本对应关系
版本对应参考官方文档:https://github.com/spring-projects/spring-data-elasticsearch/blob/master/README.md
| spring data elasticsearch | elasticsearch |
|---|---|
| 3.2.x | 6.5.0 |
| 3.1.x | 6.2.2 |
| 3.0.x | 5.5.0 |
| 2.1.x | 2.4.0 |
| 2.0.x | 2.2.0 |
| 1.3.x | 1.5.2 |
版本不适配解决方法
- 查看
spring data elasticsearch的版本号 - 安装对应版本的
elasticsearch即可 - 当然也可以根据安装的
elasticsearch版本改变Springboot版本
解决办法示例:
1 | # 安装对应版本的elasticsearch |
1 | # 启动对应版本的elasticsearch |
我个人本次测试环境:
- Springboot:
1.5.19 - elasticsearch:
2.4
附录一:使用的Linux命令
mkdir创建文件夹pwd查看当前所在路径scp -r CentOS-7-x86_64-Minimal-1810.iso root@192.168.1.8:/opt/sortware在当前文件上传文件到指定服务器文件夹cat /etc/centos-release查看系统版本rm -rf jdk-8u201-linux-i586.tar.gz不提示的递归删除文件或者文件夹tar -zxvf jdk-8u201-linux-x64.tar.gz解压hostnamectl查看主机名whereis sudoers查找文件位置ls -l /etc/sudoers查看文件权限chmod -v u+w /etc/sudoers加入可写权限firewall-cmd --state查看防火墙状态systemctl stop firewalld.service关闭防火墙
附录二:CentOs7安装jdk1.8
1.上传安装文件
1 | /opt/sortware/jdk-8u201-linux-x64.tar.gz |
2.解压
1 | tar -zxvf jdk-8u201-linux-x64.tar.gz |
3.重命名
1 | mv jdk1.8.0_201 jdk1.8 |
4.打开系统配置文件
1 | vi /etc/profile |
5.添加环境变量
1 | ## Java |
6.重启配置文件
1 | source /etc/profile |
7.查看版本
1 | java -version |
附录三:CentOs7安装docker
附录四:常用docker命令
删除所有容器
1 | docker rm `docker ps -a -q` |
查看存在的镜像
1 | docker images |
查看所有启动的容器
1 | docker ps -a |
停止容器
1 | docker stop |
搜索仓库
1 | docker search elasticsearch |
拉取仓库
1 | docker pull registry.docker-cn.com/library/elasticsearch |
附录四:docker安装kibana
下载kibana镜像
1 | docker pull kibana:latest |
启动kibana
1 | docker run --name kibana --link ES14:elasticsearch -p 5601:5601 -d kibana |